Physical Address
304 North Cardinal St.
Dorchester Center, MA 02124
Physical Address
304 North Cardinal St.
Dorchester Center, MA 02124

”
Let me take you back to my college days – remember those all-nighters fueled by instant noodles and questionable life choices? That’s exactly how I stumbled into PHP. At first, it felt like trying to read hieroglyphics while riding a rollercoaster. The syntax made my eyes cross, and don’t even get me started on server configurations! But here’s the kicker: once it clicked, PHP became my secret weapon for building dynamic websites faster than you can say “Hello World”.
So why am I writing this guide? Two reasons: 1) I wish someone had handed me a roadmap when I was drowning in PHP documentation, and 2) Let’s be real – I still need quick refreshers myself sometimes. Whether you’re building your first WordPress site or just curious about backend magic, consider this your friendly cheat sheet to skip the headaches I endured.
Fun fact: Over 75% of websites using server-side programming languages rely on PHP. That’s like 8 out of 10 websites you visit daily! But here’s the real game-changer – setting up a local environment turns you from spectator to player. Imagine testing website changes without risking your live site – it’s like having a digital sandbox for adults.
Remember my first WordPress disaster? I tweaked a theme file directly on the live server and poof – white screen of death. That’s when I realized local environments aren’t just convenient – they’re career-savers. Want to avoid rookie mistakes? Stick with me through this guide.
Pro tip: Bookmark this page – I still reference my own notes when trying new plugins or theme customizations. Got questions? Drop them in the comments – let’s learn together!
Let me break down this ‘local environment’ thing in a way that even my coffee-deprived brain can understand. Picture this: you’re building a website but don’t want the whole internet watching your clumsy coding attempts. That’s where a local environment comes in – it’s like your digital sandbox where you can play with PHP code without breaking anything live.
When I first started, I thought it was just fancy tech jargon. Turns out, it’s basically your computer pretending to be a web server. You get all the essential components – PHP processor, MySQL database, server software – neatly packaged on your machine. Need to test a new WordPress plugin? Want to experiment with custom themes? This is your safe space.
Here’s why I love it: You can crash your site ten times before breakfast, and nobody will know. The local environment mimics real hosting conditions but keeps everything contained. It’s like having a private chemistry lab for website development – mix those dangerous code combinations without setting fire to your actual site!
Let’s get technical (but not too technical). The magic happens through three main components: a web server (Apache/Nginx), PHP processor, and database system. Tools like WAMPserver bundle these together neatly. Remember when I tried installing them separately? Let’s just say it involved pizza, all-nighters, and some creative swearing.
Pro tip: Your local environment grows with you. Start simple, then add tools like version control or debugging aids. It’s your personal coding playground – want to try that experimental PHP 8.3 feature? Go wild! Need to test database migrations? Knock yourself out. The best part? No hosting fees and instant loading speeds.
Still not convinced? Imagine tweaking your WordPress site while commuting, without internet. Yes, that’s possible! Local environments let you work offline too. Isn’t that better than waiting for hotel WiFi to load your staging site? (We’ve all been there)
Let me tell you why setting up a PHP playground on your computer is like having a secret lab for WordPress development. Remember when we used to experiment with chemistry sets as kids? A local environment gives you that same freedom to mix and match without breaking anything live. I’ve burned enough midnight oil fixing crashed websites to know this is non-negotiable.
Here’s the deal – working directly on a live server is like performing open-heart surgery without anesthesia. That plugin conflict that crashes your site? With a local setup, you can troubleshoot in your pajamas at 2 AM without sweating bullets. I once spent hours debugging a theme issue that turned out to be simple PHP version mismatch – something I could’ve spotted instantly in a controlled environment.
The real magic happens when you want to test-drive new features. Imagine trying out that fancy page builder plugin or experimenting with custom code snippets. On a live site? You’re gambling with your visitor experience. Local development lets you play mad scientist – break things, fix them, then deploy only what works. It’s like having an undo button for web development.

Speed matters too. Ever waited ages for files to upload via FTP? Local environments cut that nonsense. Changes happen faster than you can say “Ctrl+S”. Need to show a client progress? Tools like WAMPserver let you create temporary access points. No more “it works on my machine” excuses!
Here’s a pro tip from someone who’s learned the hard way: Your local setup becomes a time machine. Found a plugin that breaks your site after updating? Roll back PHP versions faster than you can Google the error code. Want to test across different WordPress versions? Keep multiple sandboxes ready. It’s like having superpowers in the WordPress universe.
And let’s talk security – that client site holding sensitive user data? Developing locally means zero exposure until you’re battle-ready. No more panicking about unfinished work getting indexed by search engines. You control when the curtains rise.
Still think you can skip this step? Picture this: You’re about to launch a crucial update. The live site goes down. Traffic’s bleeding away. With a proper local replica, you can troubleshoot and redeploy faster than Starbucks makes your morning latte. That’s peace of mind money can’t buy.
Curious about setting this up? Stick around – I’ll walk you through choosing the right tools and avoiding the pitfalls that tripped me up when I was starting out. Trust me, your future self will high-five you for taking this seriously. Got questions already? Drop ’em below – we’re all here to learn!
When I first started tinkering with WordPress sites, I remember feeling overwhelmed by all the server jargon – until I discovered the magic of local environment tools. Let me share two lifesavers I’ve personally tested: WAMPserver and XAMPP. These tools essentially create a mini-server playground right on your computer, perfect for testing themes or plugins without risking your live site.
While both tools get the job done, I eventually settled on WAMPserver for my WordPress projects. Why? It’s like the difference between a Swiss Army knife and a chef’s knife – both useful, but one feels purpose-built. WAMPserver’s Windows-native design integrates seamlessly with my workflow, and their one-click WordPress installation (more on that later) saved me countless hours. XAMPP’s cross-platform capability is great if you’re hopping between operating systems, but let’s be real – most of us stick to one primary machine for development.
Here’s a pro tip I learned the hard way: Always check port conflicts! That time Skype hijacked my port 80? Let’s just say I almost threw my laptop out the window before realizing WAMPserver’s neat port-checking feature. The folks at B2B Huoke have some great troubleshooting guides if you hit similar snags.
 What really sold me on WAMPserver was its database management simplicity. MySQL can feel like navigating a dark room full of LEGO bricks barefoot, but their phpMyAdmin integration lights up the path. For WordPress newbies especially, having everything in one control panel reduces that ‘I’m in over my head’ feeling we all get when starting out.
Ever tried explaining local servers to a non-techie friend? I compare WAMPserver to a digital photography darkroom – you can experiment freely without worrying about exposing your half-finished work to the world. And when you’re ready to go live? It’s just a matter of moving your perfected creation to actual hosting.
Curious which version to install? I recommend going with the latest stable release unless you have specific legacy needs. The developer community around WAMPserver keeps growing too – I’ve found some brilliant solutions on their forums that even the official docs don’t mention. Happy coding, and remember: Every expert was once that confused newbie staring at a blank localhost screen!
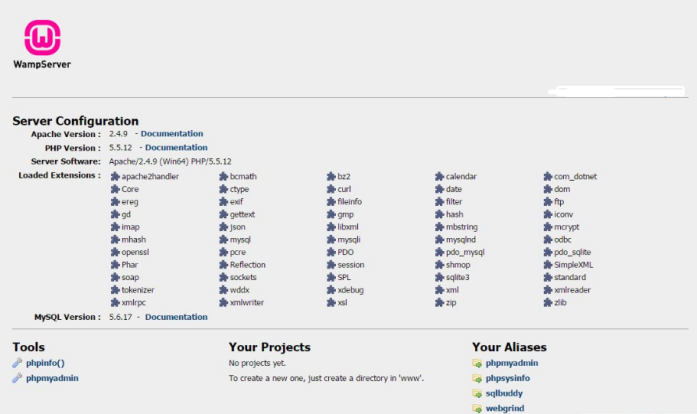
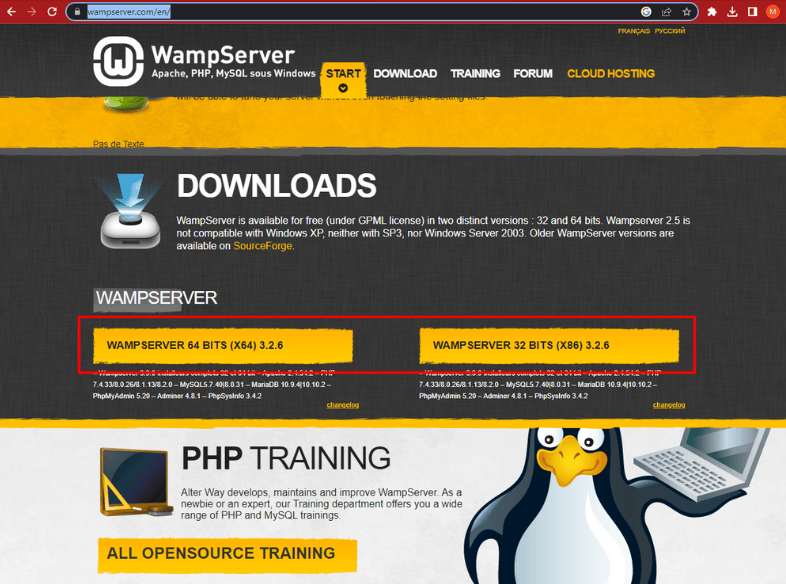
Hey there! Let me walk you through the WAMPserver setup process I wish I had when starting out. First things first – head over to the official WAMPserver site (bookmark this page, trust me). You’ll see different versions available – I usually go with the 64-bit version unless working on older machines. Pro tip: Check your Windows system type beforehand through Settings!

When the installer starts, you’ll get some security warnings – don’t panic! Just temporarily disable your antivirus (remember to turn it back on later). During installation, keep the default directory unless you’re comfortable with custom paths. I made the mistake of changing this once and spent hours debugging path errors!
The magic happens when that WAMP icon turns green in your system tray. But wait – if it stays orange, you might have port conflicts. Try right-clicking the icon > Tools > Test port 80. If Skype or IIS is hogging it, you’ll need to either close those programs or configure alternative ports.
First-time users often overlook the PHPMyAdmin setup. After installation, open your browser to localhost/phpmyadmin – this is your database playground. Create a new database (name it something memorable) and note down the credentials. Pro tip: Use ‘root’ as username with blank password for local development – just never use these in production!
Remember when I said about antivirus? Once had a client whose firewall blocked Apache completely. If services won’t start, check your security software exceptions. Takes 5 minutes to fix but saves hours of frustration. Anybody else run into weird permission issues during their first install?
Final check: Create a test.php file in the www directory containing . Access it via localhost/test.php – you should see a rainbow-colored PHP configuration page. If this works, congratulations! You’ve just built your PHP playground. Now who’s ready to install WordPress?
Here’s something I learned the hard way – installing WAMPserver doesn’t always mean smooth sailing. Let’s talk about checking port 80 functionality, the digital handshake your local server needs. After installation, I immediately opened my Chrome browser and typed localhost or 127.0.0.1, expecting the WAMP dashboard. Surprise! Sometimes you might see connection errors instead.
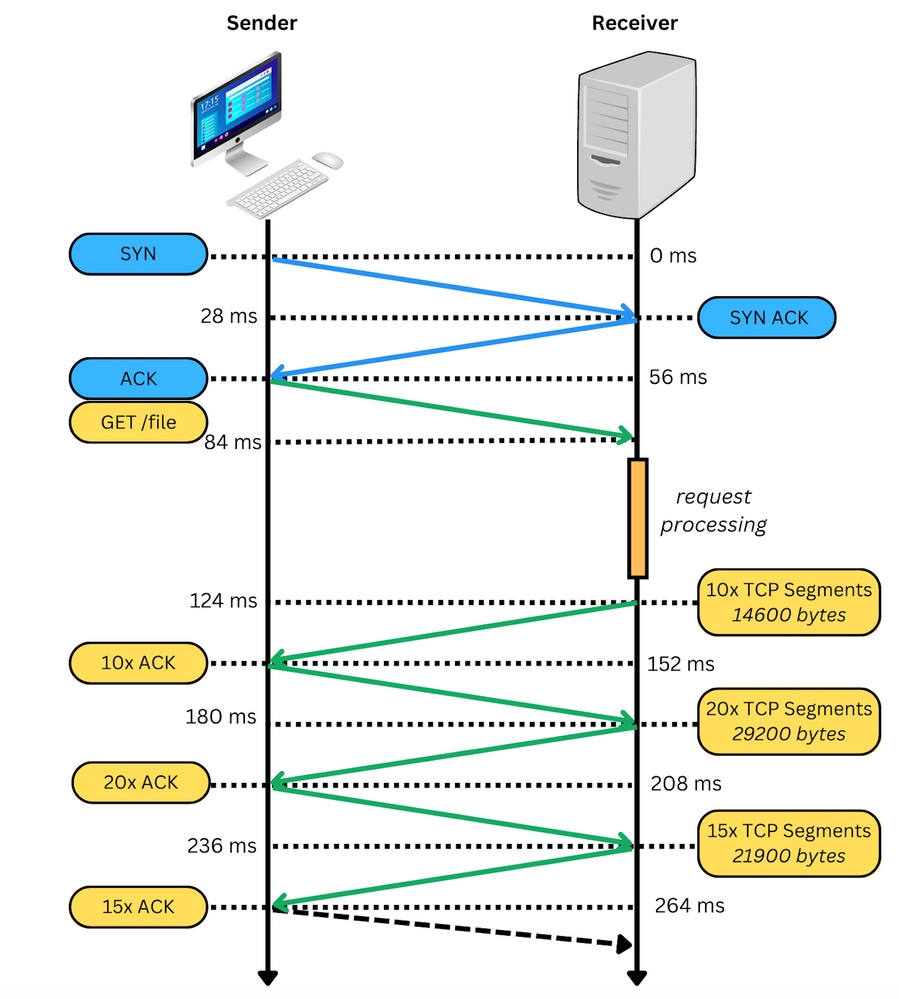
Why does this happen? Port 80 – the VIP entrance for web traffic – might already be occupied. Skype and IIS are usual suspects. Remember when I struggled for hours only to find Zoom hogging my port? Here’s my quick check method: Right-click the WAMP icon > Tools > Check port 80. If it shows ‘Port 80 not accessible’, time to play detective.
For visual learners, this troubleshooting guide offers great screenshots. Pro tip: If changing ports sounds scary (it did to me!), try stopping conflicting services first. Changed to port 8080? Don’t forget to use localhost:8080 when accessing!
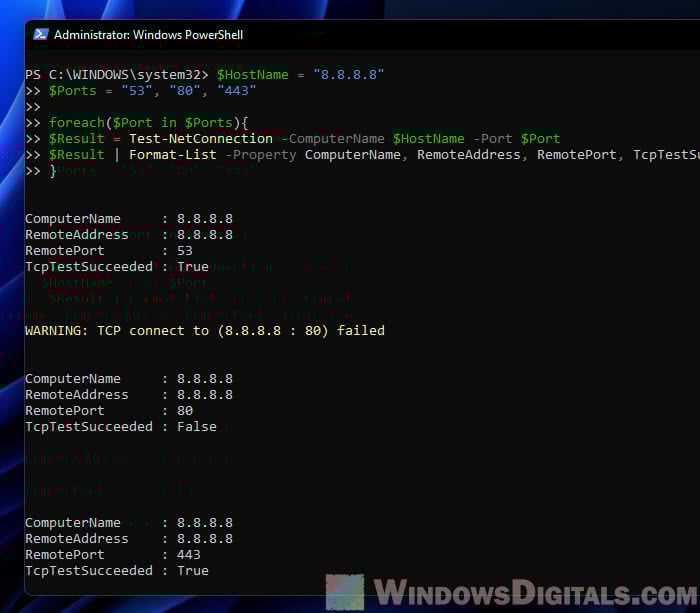
When that green WAMP icon finally glows, you’ve won half the battle. But wait – can other devices on your network access it? That’s when you’ll want to check your firewall settings. Found this process useful? I wish someone had walked me through these checks when I first started tinkering with local WordPress setups!
Let me walk you through the database setup process – this is where many beginners get tripped up, but trust me, it’s simpler than it looks. Remember when I first tried this? I spent hours clicking around phpMyAdmin like a lost tourist! Here’s the smarter way to do it…
Start by opening your WAMPserver and click that shiny phpMyAdmin button. Pro tip: Bookmark the phpMyAdmin official site for quick reference. You’ll land on a login page where you’ll use “root” as username and leave the password empty (don’t worry, we’ll secure this later).

Now let’s create your WordPress home. Click “Databases” tab and type a name like “mywp_site1”. Keep the collation as “utf8_general_ci” – that’s the sweet spot for multilingual support. Need help choosing a naming convention? Check out these database best practices I wish I knew earlier.
Here’s where magic happens: User privileges. Create a new user account specifically for WordPress – never use the root account! I usually name mine something like “wp_user1” with a strong password. Grant them ALL PRIVILEGES to your new database. Think of this like giving a valet your car keys but not your house keys.
Wait, what if you mess up? Don’t panic! phpMyAdmin lets you export/import databases easily. I once accidentally deleted a table right before a client demo (facepalm). Now I always create backups before making changes.
Pro tip: Set your database connection details in a notepad – you’ll need them for WordPress installation. The standard setup uses:
Ever wondered why some sites load faster? Proper database optimization plays a huge role. While you’re here, explore the “Operations” tab to set up regular maintenance. It’s like giving your database a weekly spa treatment!
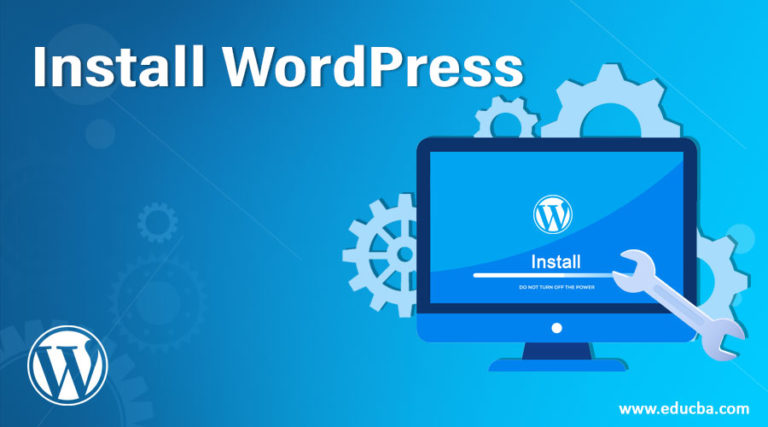
Now comes the exciting part – actually installing WordPress on your local server! Many beginners find this step surprisingly straightforward once they’ve set up their environment properly. Let me walk you through the process I’ve used successfully dozens of times.
After setting up your database in phpMyAdmin (remember we created that “wordpress_db” earlier?), you’ll want to download the latest WordPress package from the official site. I usually save the zip file directly to my www directory in the WAMP folder – that’s typically located at C:\wamp64\www on Windows systems. Unzipping these files might take a minute or two depending on your computer’s speed.
When you navigate to localhost/your-folder-name in your browser, the famous WordPress installation screen should greet you. This is where many first-time users get tripped up – make sure you’re entering the database details exactly as you set them up earlier. The database host will usually stay as localhost, and the table prefix can remain default unless you’re planning multiple installations.
Ever seen that “Error establishing database connection” message? Don’t panic if this happens – it usually means either your database credentials are wrong or your MySQL service isn’t running. Double-check your WAMP server’s status (should be green!) and verify your database details again. I’ve made that mistake myself more times than I’d care to admit!
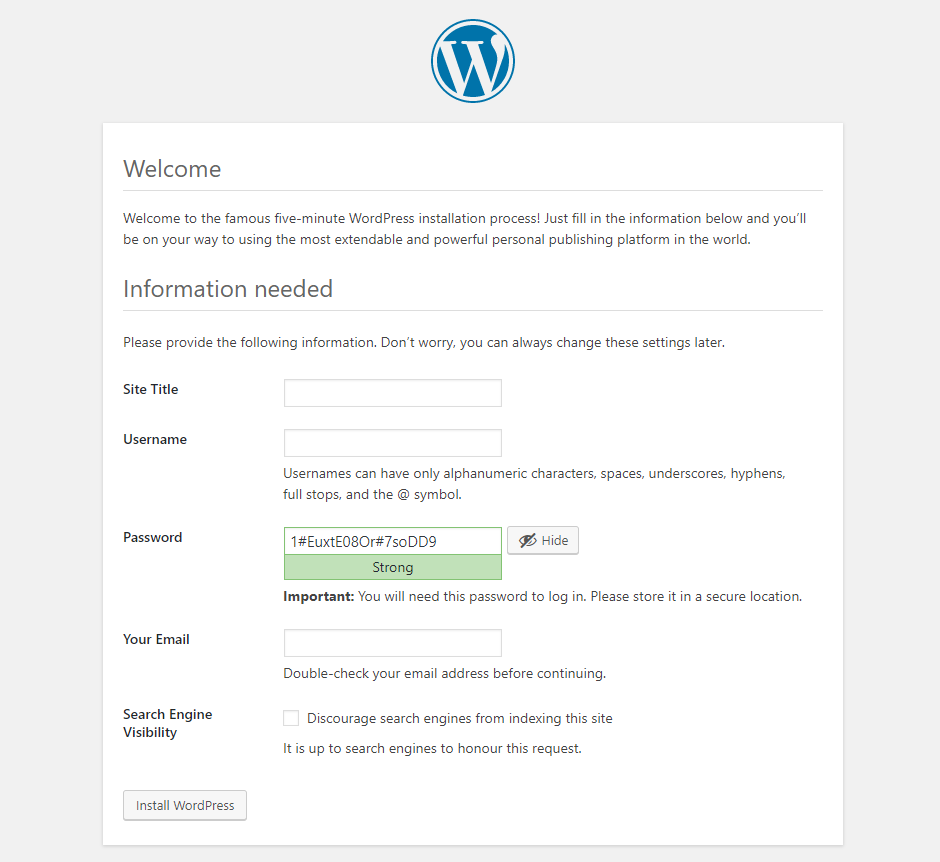
Once you get past the database setup, you’re practically home free. The final steps involve setting up your admin credentials and site title. Pro tip: Use a strong password here even though it’s just a local installation – it’s good practice for when you deploy live sites later. After clicking that install button, you should see the glorious WordPress dashboard appear. Feels like unlocking a secret door to website creation, doesn’t it?
Remember, this local installation is your playground. Want to experiment with different themes or test plugins without consequences? Go wild! That’s the beauty of working locally. If you get stuck at any point, there’s excellent documentation available through developer communities that I’ve found invaluable over the years.
Wrapping up our PHP environment setup journey, let me share something from my college days – back when I accidentally crashed three test servers in one week (yikes!). That’s exactly why creating a local environment matters so much! By now, you’ve got your WAMPserver humming, databases talking, and WordPress ready to roll. Doesn’t it feel like having your own digital playground where you can experiment without breaking a live site?

Here’s the kicker – over 60% of web developers I know test locally before pushing changes. Want to join the smart crowd? Remember to check those port configurations (yes, even if it seems tedious) and always, always backup your databases. Pro tip: Bookmark that WAMP troubleshooting guide – it’ll save your bacon when Apache decides to be moody.
Hit any snags during your setup? Or maybe you’ve got a killer local development hack to share? Drop your thoughts below – let’s turn this comments section into a goldmine of PHP wisdom! For more web development nuggets, check out our curated resources list. Happy coding, and remember – every error message is just the computer’s way of saying ‘let’s grow together’!
